How to set up the SimAggregator app on an Android phone
A step-by-step guide to the SimAggregator app for Android. Install the APK, grant permissions, confirm the phone in your cabinet and put its SIM numbers on sale.
The app turns an Android phone into a supplier device. It passes the SMS that arrive on the phone's SIM cards to SimAggregator, and buyers rent those numbers. Setup takes about ten minutes. You need the phone and a browser where you are signed in to your supplier cabinet.
On the phone the app is called SIM Aggregator, and its interface is in English.
What you need
- An Android phone with Android 6.0 or newer and at least one SIM card. Dual-SIM phones are supported: every SIM card is listed separately.
- Internet on the phone, over Wi-Fi or mobile data.
- A supplier account that has finished registration in the cabinet. An account without a supplier profile cannot connect a phone.
- A charger. The phone has to stay switched on and plugged in.
Use SIM cards that are meant only for SimAggregator. The app does not filter messages: the SMS that arrive on a working SIM card go to the platform, including the messages already in its inbox when the SIM card starts working. Do not keep a personal SIM card in this phone.
Step 1. Install the app
The app is installed from an APK file that you download from the cabinet.
- Open the cabinet in the phone's browser, go to Download software and tap Download APK on the Phone app card.
- The browser may warn you about the file. In Chrome the warning is File might be harmful: tap Download anyway.
- Open the downloaded file. If Android says that the phone is not allowed to install unknown apps from this source, tap Settings, switch on Allow from this source and go back. If the installation question does not appear, open the downloaded file again.
- Android asks Do you want to install this app? Tap Install.
- When you see App installed, tap Open. Later, open SIM Aggregator from the list of apps.
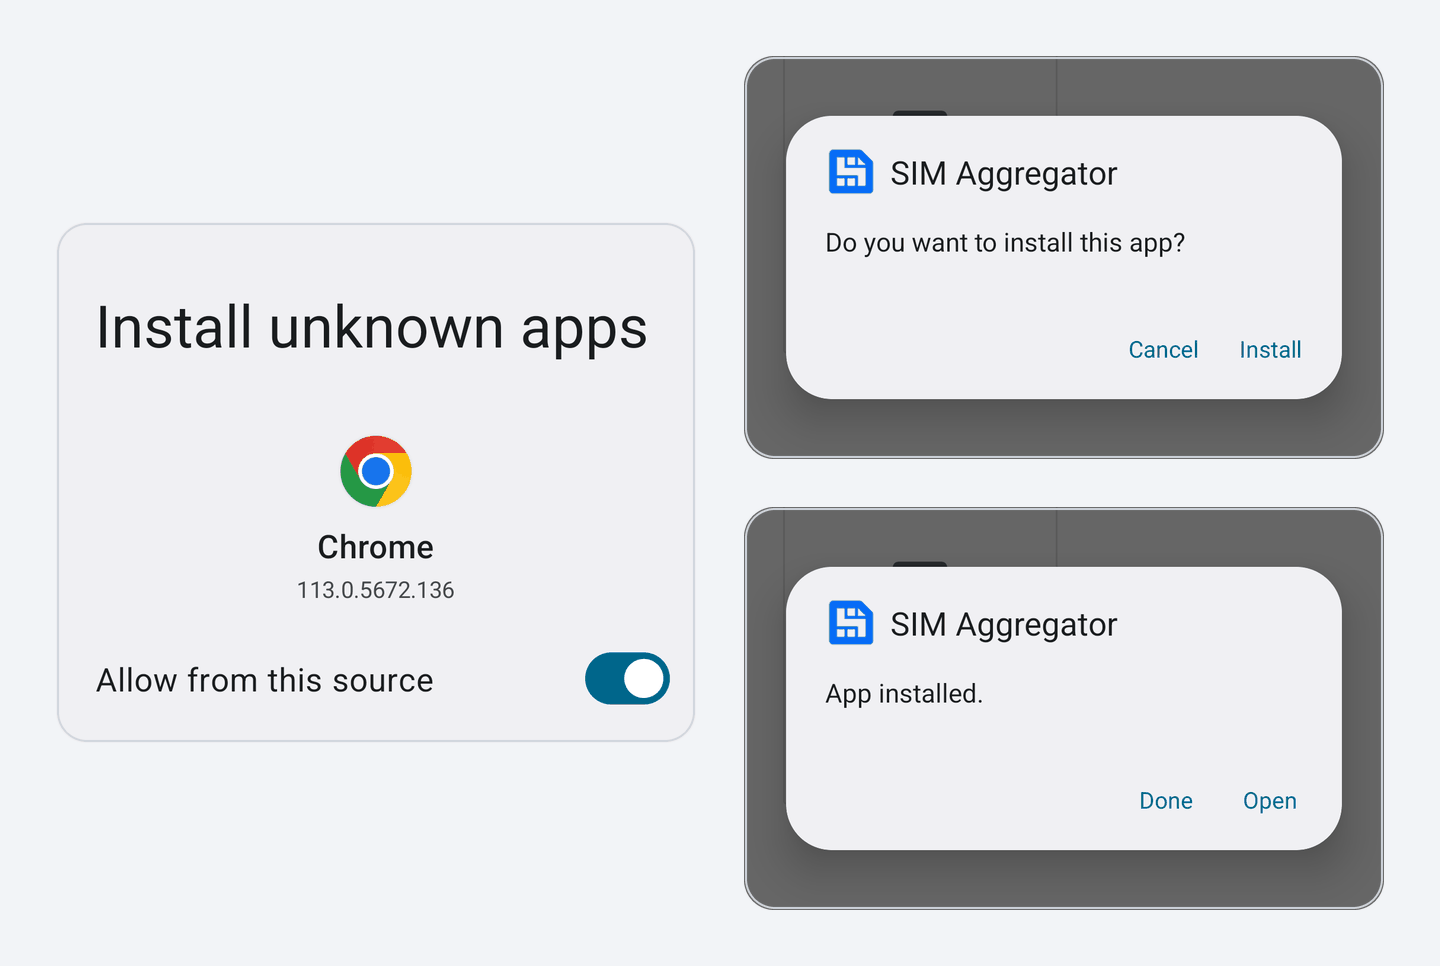
These screens and buttons are named differently on different Android versions and phone brands. The phone may also offer its own security check for an app that does not come from the app store: let it check the app and continue. If the phone blocks the installation, contact support.
Step 2. Grant permissions
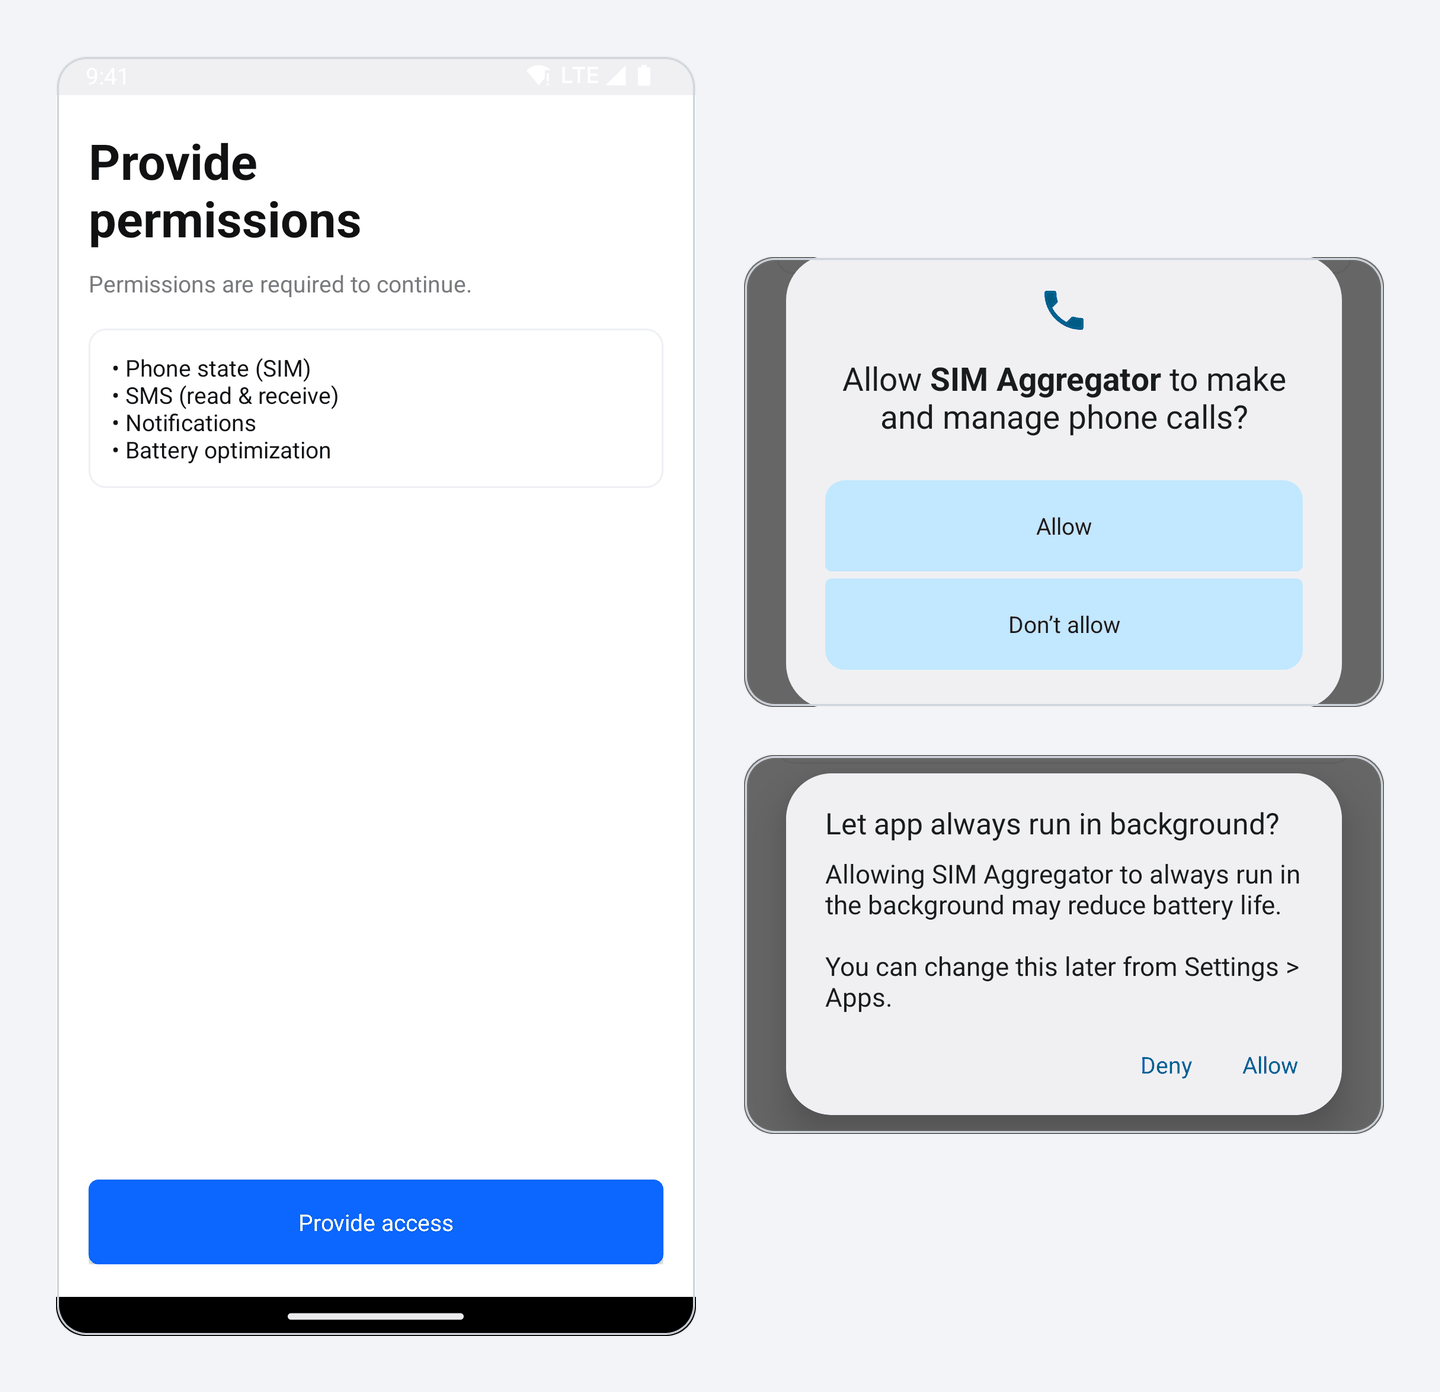
The app opens with two intro screens: tap the screen to move on. Then comes Provide permissions.
- Tap Provide access and allow each request that Android shows:
- notifications, so that the app can show that it is working in the background;
- phone calls, so that the app can read the SIM cards and send the operator a service request that returns the SIM card's number. The app does not make or answer voice calls;
- SMS, so that the app can receive and read incoming messages.
- Right after that Android asks whether the app may always run in the background (Let app always run in background?). Choose Allow. Without this Android puts the app to sleep, and SMS reach buyers late. If you closed that window, tap Disable battery optimization to see it again.
- When the screen says All permissions granted, tap Continue.
If you declined a request by mistake and the app shows Some permissions were not granted, tap Open settings and allow the missing permission there.
Step 3. Confirm the phone in the cabinet
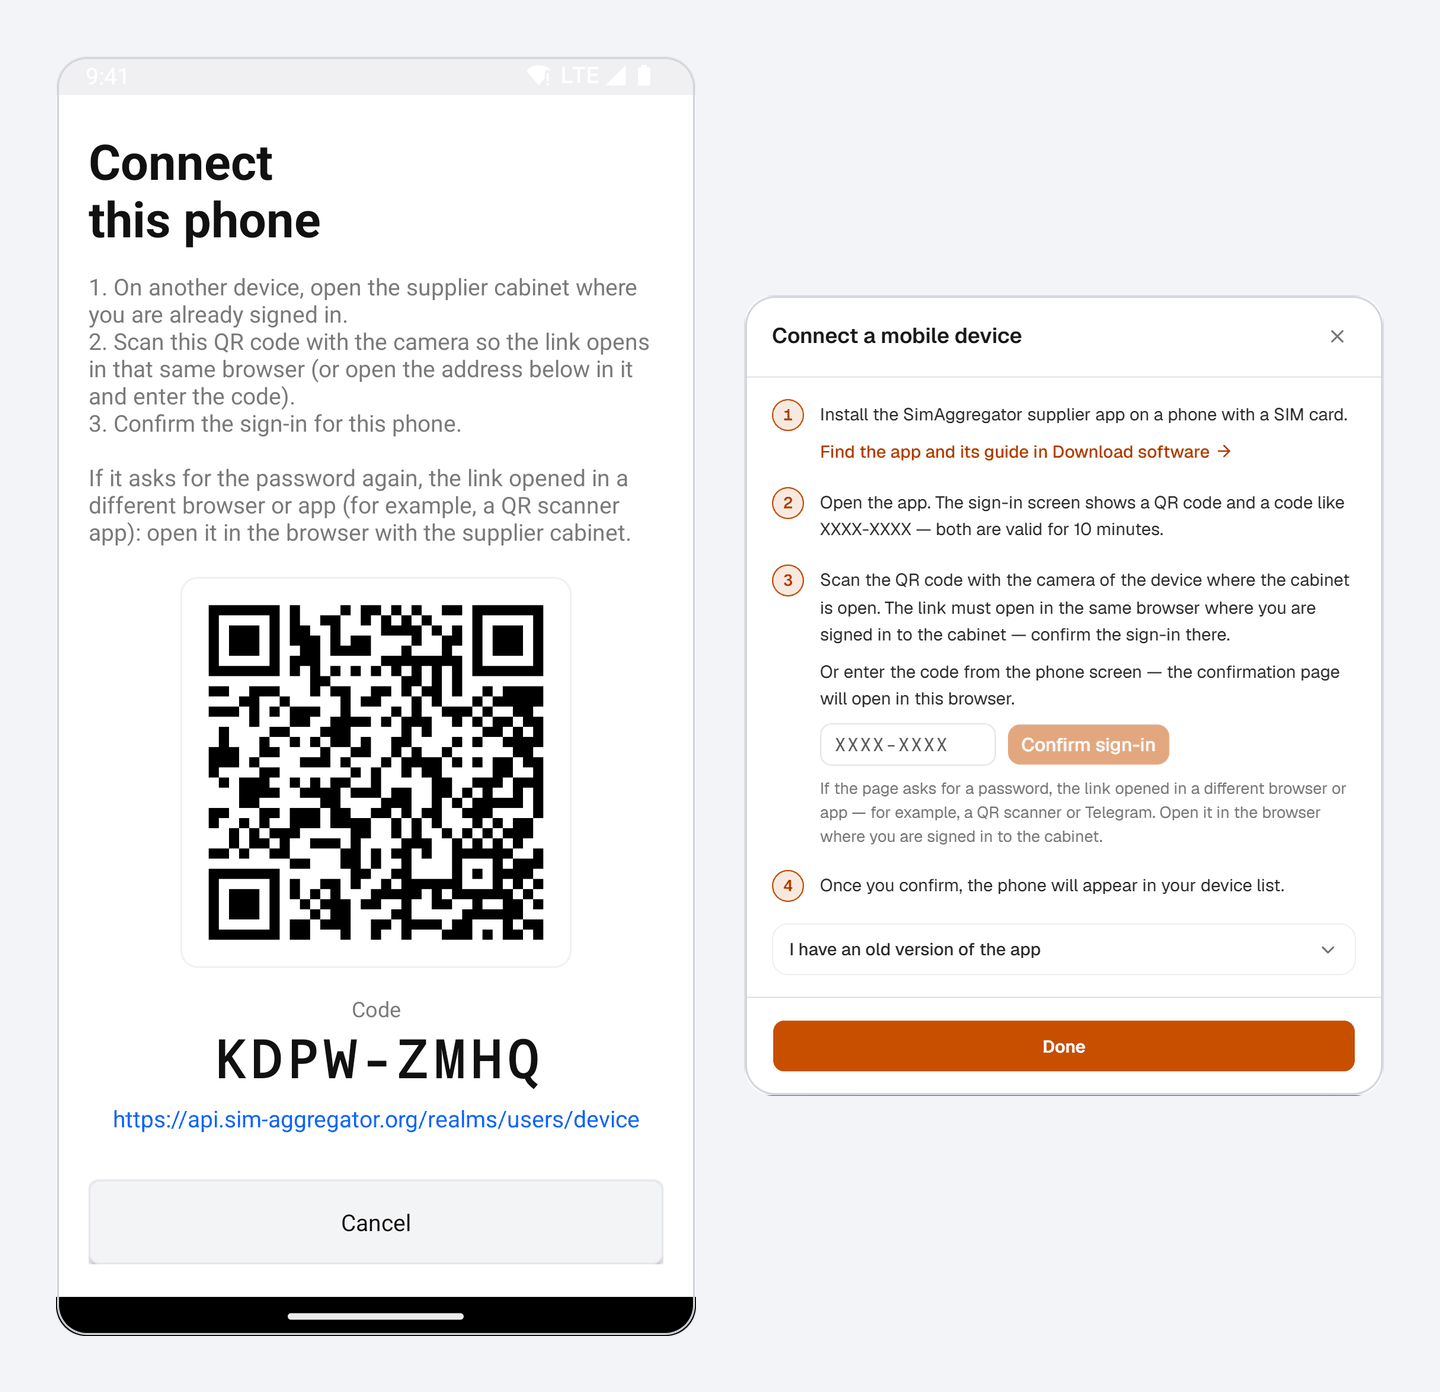
The app never asks for your password. Instead, the Connect this phone screen shows a QR code, a code like XXXX-XXXX and an address. They are valid for 10 minutes.
Confirm the sign-in on a device where you are already signed in to the cabinet, for example your computer:
- In the cabinet open Devices and click Connect a mobile device.
- Type the code from the phone into the field and click Confirm sign-in. The confirmation page opens in the same browser. You can also scan the QR code with that device's camera instead of typing the code.
- On the confirmation page click Allow. When the page says Device connected, look at the phone: it shows Signed in. Registering the device... and then opens the main screen.
You can also confirm on the same phone: tap the address under the code, and it opens in the phone's browser. This works if you are signed in to the cabinet in that browser.
If the code has expired, tap Get a new code on the phone. If the confirmation page asks for a password, the link opened in a browser or app where you are not signed in, for example in a QR scanner. Open it in the browser where the cabinet is open.
Step 4. Check the numbers
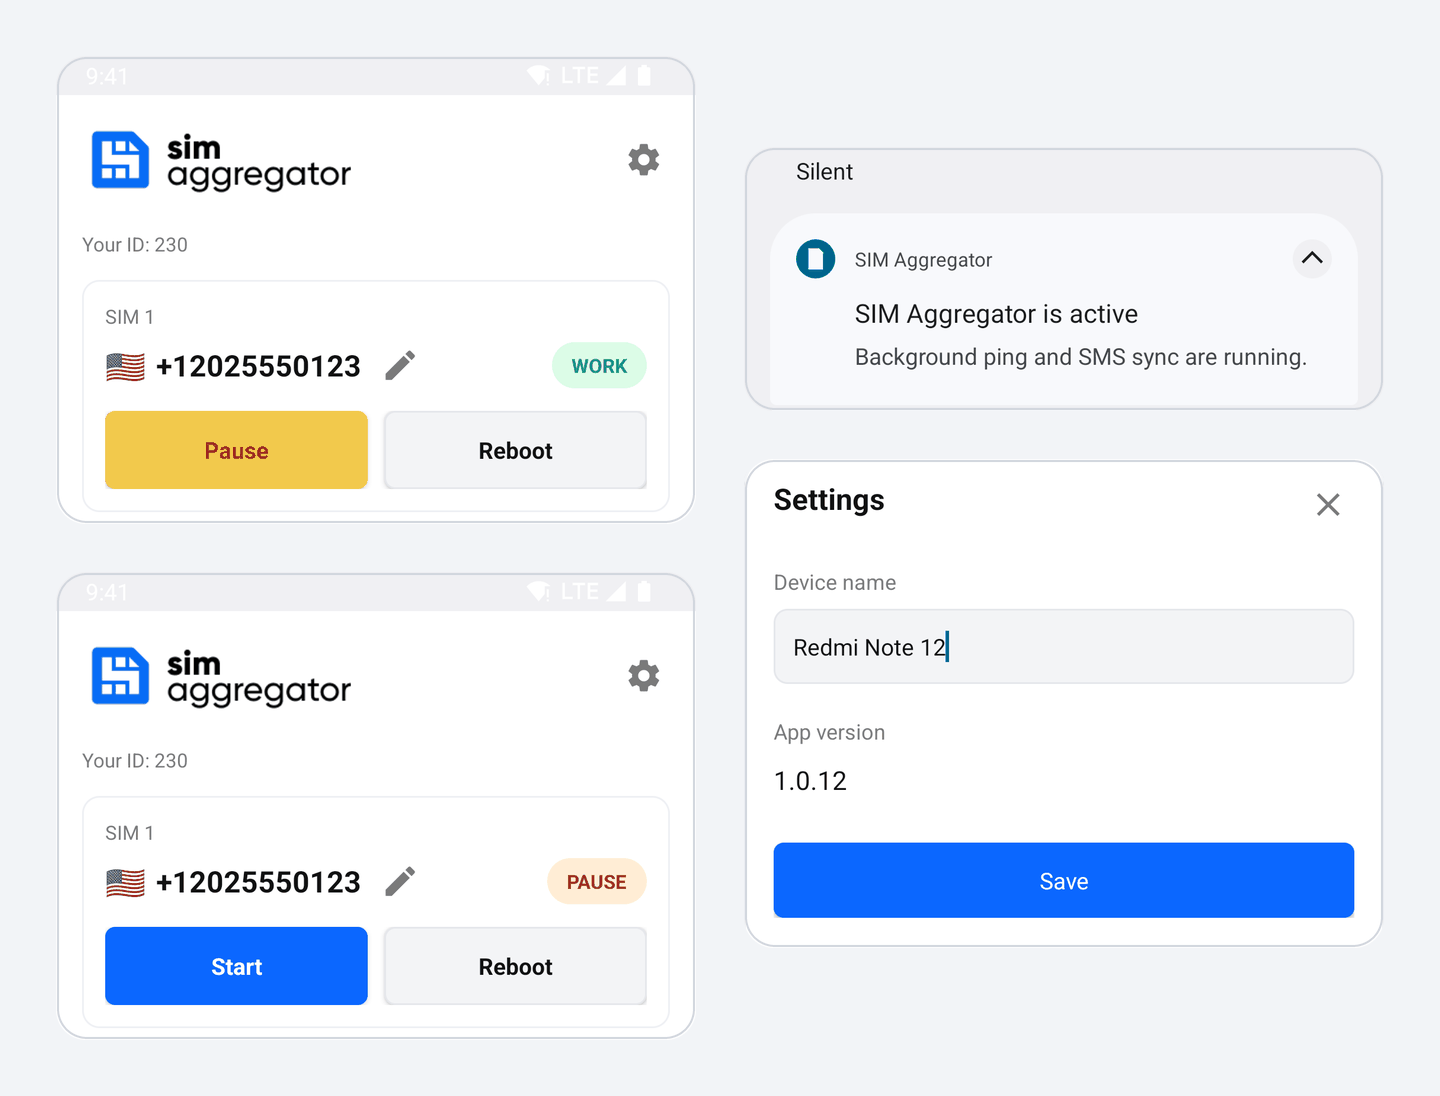
The main screen shows a card for every SIM card: its number, a status and the buttons.
- WORK means the app is working with this SIM card. Its number is offered to buyers, and incoming SMS go to the platform.
- PAUSE means the app is not using this SIM card. Start puts it to work, Pause stops it and takes the number off sale.
- Error means the SIM card needs attention. The reason is written in red under the buttons. Fix it, and if the status then is PAUSE, tap Start.
The app needs the phone number of every SIM card. Some SIM cards store their own number, and the app reads it. For the others, enter the number yourself:
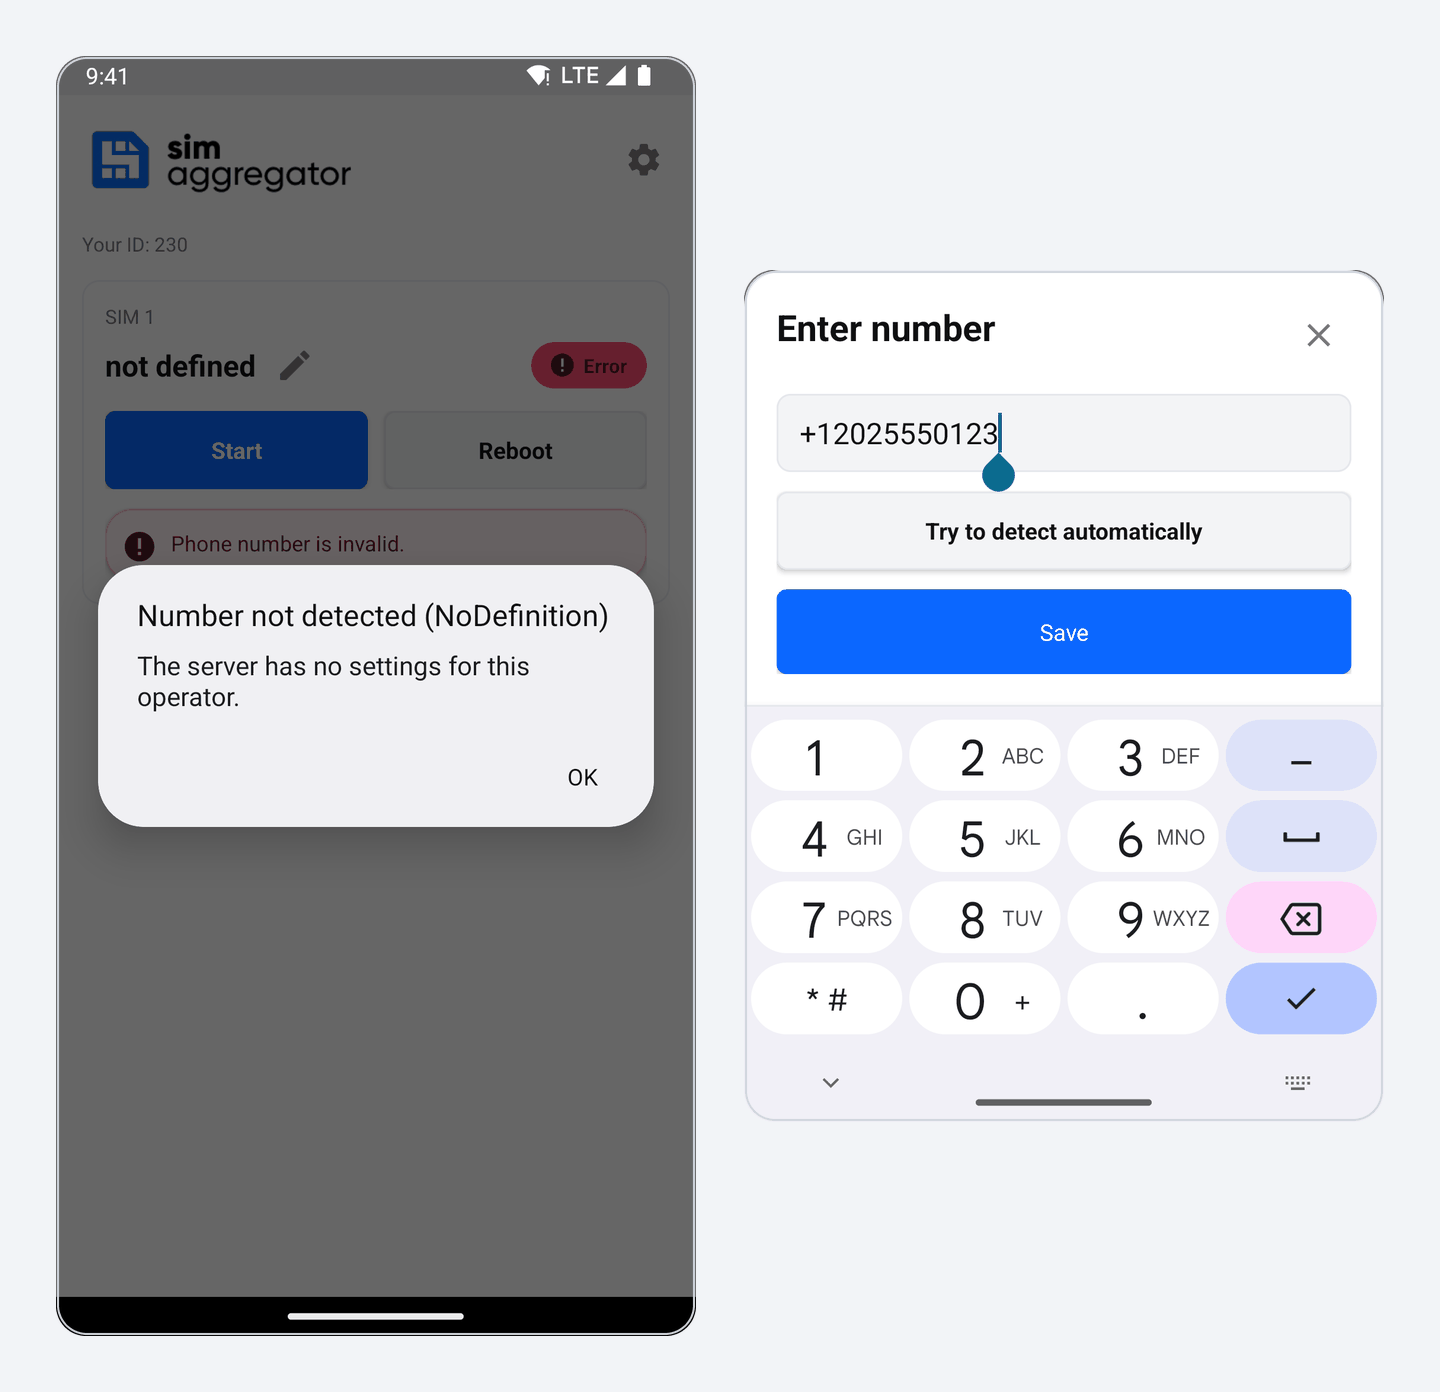
- Tap the pencil next to the number.
- Type the number in international format, with the country code, for example
+12025550123. - Tap Save. The card shows the country flag. If the status is PAUSE, tap Start. Once the status is WORK, the number goes on sale within a few minutes.
Detecting the number automatically
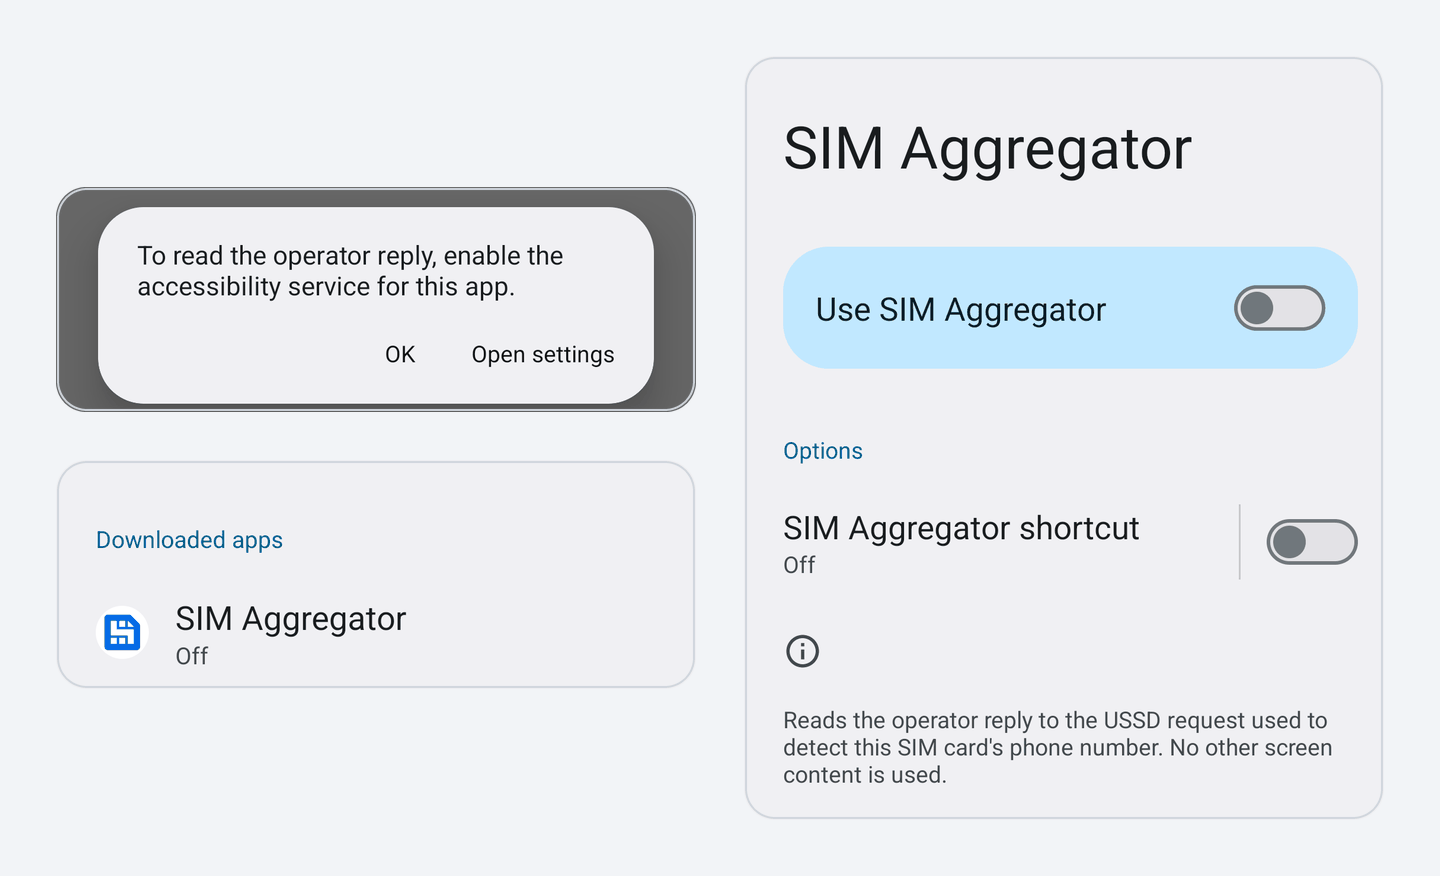
The app can also ask the mobile operator for the number. To read the operator's reply it needs the Android accessibility service:
- When the app says To read the operator reply, enable the accessibility service for this app, tap Open settings.
- Choose SIM Aggregator in the list of installed apps and switch on Use SIM Aggregator.
- Return to the app. Detection starts by itself. When it succeeds, the app saves the number and puts the SIM card to work. To run detection again later, tap the pencil and then Try to detect automatically.
The app uses the service only during this request, to read the window with the operator's reply. While the request runs, the phone's dialer covers the screen, and the reply can take up to a minute. This is expected, do not close it.
If Android answers Restricted setting when you switch the service on, open the app's App info page in the phone settings, tap the three dots in the top corner, choose Allow restricted settings and try again.
Not every operator is supported. If the app says Number not detected, tap OK and enter the number manually.
Step 5. Check the cabinet and set prices
Open Devices in the cabinet. The phone is in the list and is marked as online. By default it is named after the phone model. To rename it, tap the gear icon in the app, change Device name and tap Save.
Numbers are sold at your prices. Set them in Prices. The article How to set your first price explains where to start.
Keep the phone working
- While the app is working with at least one SIM card, Android shows the notification SIM Aggregator is active. It means the app is working in the background.
- Keep the phone on a charger and connected to the internet. A phone that goes offline stops selling: see Keeping devices online.
- Do not force-stop the app, and do not switch battery optimization back on for it. Some phones have their own battery saver or autostart manager: allow SIM Aggregator to start automatically and to run without restrictions there.
- After the phone restarts, open the app once. Full background work resumes when the app is opened.
- When a new version is out, the button update the app appears at the bottom of the screen. Tap it, wait for the download and confirm the installation.
- If you replace a SIM card, the app stops working with it and shows SIM card changed. Review the number and start again. If the new number is not detected automatically, enter it and tap Start.
If something goes wrong
| What you see | What to do |
|---|---|
| The code has expired. Get a new code and scan it again. | Tap Get a new code and confirm the phone within 10 minutes. |
| The confirmation page asks for a password | Open the link in the browser where you are signed in to the cabinet. |
| This account has no supplier profile yet. | Finish registration in the cabinet, then get a new code. |
| Sign-in was declined in the supplier cabinet. | Deny was pressed on the confirmation page. Get a new code and click Allow. |
| SIM cards not detected | Check that the SIM card is inserted and that the phone itself sees it. |
| No permission to read SIM info. | Allow the Phone permission for SIM Aggregator in the phone settings. |
| Phone number is missing or Phone number is invalid | Tap the pencil and enter the number with the country code. |
| This number is active on another online device. | The same number is already connected through another device. Switch it off there or try again later. |
| No connection to server. | Check the internet on the phone and reopen the app. |
| Access for this phone was revoked in the supplier cabinet. | Confirm the phone again as in step 3. Your SIM settings are kept. |
If this did not help, write to support. The contacts are in the Help center.
Connecting USB modems to a computer instead? See How to set up SimAggregator for Windows.